发布时间:2019-12-31
Kendo UI for jQuery R3 2019 SP1试用版下载
Kendo UI目前最新提供Kendo UI for jQuery、Kendo UI for Angular、Kendo UI Support for React和Kendo UI Support for Vue四个控件。Kendo UI for jQuery是创建现代Web应用程序的最完整UI库。
默认情况下,禁用Kendo UI Grid的分组功能。
要启用分组,请将groupable选项设置为true。 结果网格在其标题中公开一个新的区域,使用户可以按列队网格数据进行分组。要将数据按多列分组,用户可以将所需的列拖到分组标题中。
$(“#grid”).kendoGrid({
groupable: true
// Other configuration.
});
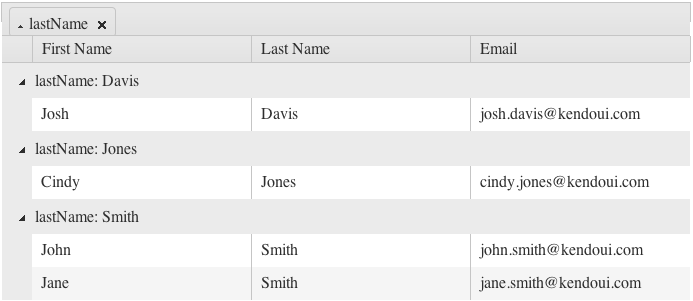
要对分组内容进行排序,请单击分组标签。要切换上一个示例中分组数据的排序顺序,请单击Name。通过单击相应标题组旁边的箭头,也可以将每个单独的组从其展开状态切换到折叠状态。
图1:启用分组功能的网格
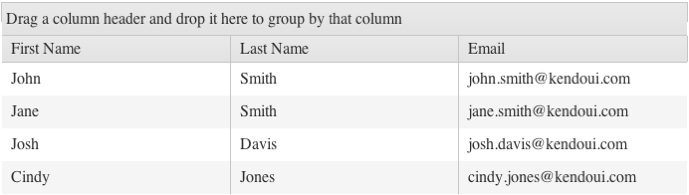
图2:数据按姓氏分组的网格
行模板明确定义行标记,而分组要求您更改行标记。要同时使用这两个功能,请在行模板中包含一个脚本,该脚本根据现有组的数量添加其他单元格。
$(document).ready(function () {
// window. can be omitted if the function is defined outside the document.ready closure.
window.getGridGroupCells = function(id) {
var cnt = $(“#” + id).data(“kendoGrid”).dataSource.group().length,
result = “”;
for (var j = 0; j < cnt; j++) {
result += “<td class=’k-group-cell’> </td>”;
}
return result;
}
$(“#GridID”).kendoGrid({
groupable: true,
rowTemplate: “<tr>” +
“#= getGridGroupCells(‘GridID’) #” +
“<td>…</td><td>…</td><td>…</td></tr>”,
altRowTemplate: “<tr class=’k-alt’>” +
“#= getGridGroupCells(‘GridID’) #” +
“<td>…</td><td>…</td><td>…</td></tr>”
});
});
当您将分组与分页一起使用时,分页发生在分组之前,结果是:
要使网格能够在分页之前执行分组,请对整个数据源进行分组。 但是在这种情况下,网格的性能将降低。
通过网格,您可以在用户对数据进行分组时显示汇总的结果。若要使用聚合功能启用分组,请使用Grid的聚合,groupFooterTemplate,groupHeaderColumnTemplate或footerTemplate设置以及其数据源的group和聚合字段。
<!DOCTYPE html>
<html>
<head>
<title></title>
<link rel=”stylesheet” href=”styles/kendo.common.min.css” />
<link rel=”stylesheet” href=”styles/kendo.default.min.css” />
<link rel=”stylesheet” href=”styles/kendo.default.mobile.min.css” />
<script src=”js/jquery.min.js”></script>
<script src=”js/kendo.all.min.js”></script>
</head>
<body>
<div id=”example”>
<div id=”grid”></div>
<script>
$(document).ready(function() {
$(“#grid”).kendoGrid({
dataSource: {
type: “odata”,
transport: {
read: “https://demos.telerik.com/kendo-ui/service/Northwind.svc/Products”
},
schema:{
model: {
fields: {
UnitsInStock: { type: “number” },
ProductName: { type: “string” },
UnitPrice: { type: “number” },
UnitsOnOrder: { type: “number” },
UnitsInStock: { type: “number” }
}
}
},
pageSize: 7,
group: {
field: “UnitsInStock”, aggregates: [
{ field: “ProductName”, aggregate: “count” },
{ field: “UnitPrice”, aggregate: “sum”},
{ field: “UnitsOnOrder”, aggregate: “average” },
{ field: “UnitsInStock”, aggregate: “count” }
]
},
aggregate: [ { field: “ProductName”, aggregate: “count” },
{ field: “UnitPrice”, aggregate: “sum” },
{ field: “UnitsOnOrder”, aggregate: “average” },
{ field: “UnitsInStock”, aggregate: “min” },
{ field: “UnitsInStock”, aggregate: “max” }]
},
sortable: true,
scrollable: false,
pageable: true,
columns: [
{ field: “ProductName”, title: “Product Name”, aggregates: [“count”], footerTemplate: “Total Count: #=count#”, groupFooterTemplate: “Count: #=count#” },
{ field: “UnitPrice”, title: “Unit Price”, aggregates: [“sum”], groupHeaderColumnTemplate: “Sum: #=sum#” },
{ field: “UnitsOnOrder”, title: “Units On Order”, aggregates: [“average”], footerTemplate: “Average: #=average#”,
groupFooterTemplate: “Average: #=average#” },
{ field: “UnitsInStock”, title: “Units In Stock”, aggregates: [“min”, “max”, “count”], footerTemplate: “<div>Min: #= min #</div><div>Max: #= max #</div>”,
groupHeaderTemplate: “Units In Stock: #= value # (Count: #= count#)” }
]
});
});
</script>
</div>
</body>
</html>
了解最新Kendo UI最新资讯,请关注Telerik中文网!
扫描关注慧聚IT微信公众号,及时获取最新动态及最新资讯

 023-68661681
 返回
返回